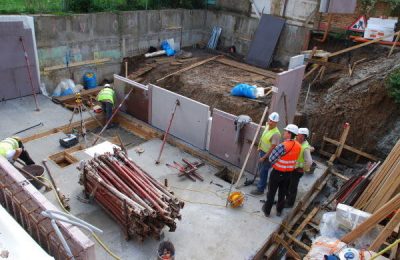
 Our MD Gus’ self-build project Zog House
According to an Ipsos Mori survey, 53% of people dream about building their own home. But how do you actually go about it?
Going from an empty plot of land to a finished home may seem like an impossible task, so let’s break it down into distinct steps so it’s more manageable.
Since we specialise in selling custom build homes, we’ve created a brief guide on the process of building a house yourself, for both a self-build and a custom build home. The steps for a self-builder are already complete if you buy a custom build home, so skip to the next section via the menu on the left if you’re a custom builder.
If there’s anything you’d like to know in more detail, please leave us a comment and we’ll cover it in a future blog.
Self-build
Find a plot

The first step is to find either a plot of land to build on, or an old unmodernised home that you can convert or refurbish into the home that you want. The usual suspects like Rightmove and Zoopla are a good place to start to see what is on the market. Plotbrowser, MyPlot, PlotSearch are also good places to start your search.
Of course, as any fan of Homes Under the Hammer will know, you can also find plots of land for sale and run down homes in need of modernisation or refurbishment at auction. There can be some real gems, albeit not without risk. Essential Information Group collates all the auctions around the UK – you can get a free trial if you’re just starting out. You can register with each of the auctioneers in your area and you will get notified when the next catalogue is live.
Auctions are a great way to find plots, but ‘caveat emptor’ (buyer beware) – it’s also where a lot of stuff gets dumped – so make sure you do your homework. The other disadvantage is that you will generally only have about 2 weeks between the catalogue going live and the auction taking place – so you will have to be speedy.
If you know what area you would like to live in, it’s also worth taking the time to just drive around the neighbourhood and see what you can find.
If that all sounds quite daunting, it may be worth signing up to a course about ‘finding land’ like this one, run by Developer Collective.
You can also read about how to find land for sale in more detail in this blog from our sister company Unboxed Homes.
Get planning permission
If your plot of land already has planning permission, then happy days! You’ve saved yourself a lot of time, angst, and risk.
However, if you have to apply for planning permission, you should speak to an architect to help you with preparing a planning pre-app. (Although we would strongly recommend you do so before you buy a plot of land without planning!).
The pre-app should give you guidance as to what the council will and will not accept. Your architect will then prepare a detailed application which will be submitted to the council, taking their pre-app feedback into account. And, all being well, planning permission will then be granted.
It may take a few tries to get planning approved for a plot, which is why buying a plot without planning permission will always carry some measure of risk.
How do you find good architect? Here are some tips on how to pick the right architect for your self-build project, to suit your personality, style, and needs.
Prepare for your project
Before putting any shovels into the ground, you will need to undertake things like a soil investigation and employ an engineer to design the structure of the house. This will allow any prospective contractors to price up the construction more accurately and give you an idea of how much it costs to build your house.
The engineer and quality surveyor (QS) should also advise you on what type of structure you should use.
Depending on where you are in the country, you may also need to consider things like:
- party walls
- rights to light
- scaffold licenses
- highways
- Infrastructure asset protection (eg railway)
Make sure that before you implement the scheme you have applied for a Community Infrastructure Levy (CIL) exemption. As a ‘self-builder’ you don’t have to pay CIL – but some self-builders have inadvertantly ‘commenced’ the development and been forced to pay thousands of pounds in CIL.
Hire a builder

While there’s no surefire way to make sure you hire a good builder, it’s always a good idea to get recommendations from friends and family on companies they’re used.
Online reviews are always a good thing to check out as well (read them with a grain of salt! Some businesses have been known to get friends and family to leave glowing reviews). Check a trade seems to be very popular – we’d recommend speaking to them first before putting a builder on the tender list.
If you can, try to visit a site that the builder is currently working on so you can see their level of work, and ideally speak to a couple of references. You’ll then need your architect or a quantity surveyor to help you put together the tender package.
You’ll need to think about whether you want to go for a ‘design and build’ contract (D&B) or a ‘traditional’ contract. The D&B will give you cost certainty (to a point) but will take away your ability to change your mind. The traditional contract is much more flexible, but you are taking on more risk.
You will also be responsible for hiring any professionals and sub-contractors that haven’t been allowed for or included in the tender package. If things go wrong, it will be down to you to sort out. Oh, and don’t forget about building regulations and home warranty insurance!
The next step after building the structure is putting in walls, which is where our custom builders will join the journey.
Custom build
Custom build is where a developer does a lot of the above – but leaves some of the work to you. There are generally three routes:
A serviced plot. This is a plot of land which has planning permission already and has all the services running to it (don’t underestimate what a pain they are to deal with!). Make sure you buy a serviced plot from a reputable custom builder. A member of NaCSBA is a good place to start as they all have to adhere to a code of practice.
A shell. This is where the developer (like Unboxed Homes) has bought the plot, got planning permission, dealt with scaffold licensing, party walls & Network Rail (among others). They have then built the outside of the home – leaving you with a watertight structure. The roof will be on, the structure will be in, stairs will be there. This means you shouldn’t need to worry about getting an engineer and you can do the interior fit out yourself, or with a builder, or ask an architect to do it.
A warm shell. This is taking it a bit beyond the standard shell – where wiring, plumbing, and heating has been done.
Turnkey. This is where a developer gives you choices in what you want in terms of layout, look, specification – but you buy it in the same way you would a normal off-plan new build home. You will have a more limited choice of options than the other routes.
So, let’s keep building!

Walls
The first thing to do is to put the partition walls where you want them – but without ‘closing them up’. You’d put in holes for where the doors are and leave space for your wiring and your plumbing.
First fix
Next up is first fix! This is where you install all your pipes, drains and wires. It gets hidden into the walls and then plastered over. You could either do some or all of the work yourself, or hire contractors to complete the work for you.
You can save money if you act as project manager and hire specialised contractors for the different parts of the interior fit out since they will have the specific knowledge and experience needed, rather than a contractor who is more generalised and will charge you for managing the ‘packages’.
This is also the point at which you would get the boiler in and underfloor heating if you are having that.
It’s then common to put the floors down, (making sure you protect them really well!), and plasterboard the partitions and walls and do the first plaster skim. At this point, your home will start to look less like a building site and more like a home.
Second fix
Next comes second fix. This is where you connect up the wires and install the sockets, switch plates, and ironmongery that need to be installed. You put in the radiators if that’s what you want and install your kitchen and bathroom of choice.
At this point, the electrical circuitry and the gas and water pipework can be tested and signed off, so you will be ready to connect to the mains gas and electrics and water. It’s always an exciting moment to be able to turn on your lights and have a warm home!
It’s worth getting curtains or blinds people in at this stage so that they can start to manufacture your curtains or blinds so that you don’t have to sleep in your lovely new house with an old sheet in the window!
Home straight
After that, you’re almost moving in. You will need to paint your walls and finish off the woodwork. The landscaping to the property would normally come as one of the last steps of the process.
You would go through your initial snagging with your builder – going around and making sure everything is how it should be – and then it’s time for your builder to move out, and you to move in to your brand new self-build home!
Practical completion
Once everything is ok and signed off, and you have all the certification that you need, your QS or architect will issue you with a practical completion (PC) certificate. Time to get the removals van as you’re moving in!
Snagging
Inevitably things may go wrong. There are generally two periods of snagging. The intitial snagging and the 12 months’ snagging.
The initial snagging takes place before you take back ownership from the builder and get to PC. A builder should offer to put anything right in the first 12 months which is time critical (heating breaking down, leaking taps, leaky roof) free of charge.
However, non time-critical (and expected snagging) will take place 12 months after PC, eg., you can expect cracks in the plaster as the building dries and settles.
And that’s our whirlwind tour of the steps needed to create your own self-build or custom build home.
It is an extremely rewarding process to build your own home, but it doesn’t come without drama and stress. If you’ve ever seen an episode of Grand Designs (and frankly, if you’re reading this, you must have done!) you’ll have seen what can and does go wrong, but hopefully you’ll have a beautiful home that’s perfect for you at the end of it.
Have more questions? Comment below, and we’ll do our best to answer them!


A useful and concise article as a starting point outlining the process. As legislation, building regs, energy efficiency etc get more complicated the role of professionals is becoming far more important in my opinion. Initially, it may seem like a large percentage of your budget is being allocated to fees. However, this is not frivolous spending if you employ the right people and more importantly, listen to their advice, especially with regard to what is achievable for the money. High expectation v inadequate budget can equal disaster. This is equally as relevant to modest projects, not just the Grand Designs. By the way, I have self built my own house. It was a design & build, with me acting as main contractor, specifier and project manager, it nearly sent me mad.
Yes, we definitely also recommend speaking to professionals as well, unless you really know what you’re doing. The money you save might end up costing you in the end.
It sounds like you really took on a lot with your project!